
How to Drip Acclimate Shrimp: The Only Safe Method
Drip acclimation is not optional for shrimp. It is the only method that introduces new shrimp to your tank slowly enough to prevent osmotic shock, moulting failures and death. Unlike fish, which can often tolerate being floated in a bag and released, shrimp are acutely sensitive to even small differences in water parameters between the bag they arrived in and the tank they are going into.
At Gensou, we have been selling and shipping shrimp across Singapore for over 20 years, and we tell every customer the same thing: drip acclimate, without exception. This guide walks you through the process step by step so you can introduce new shrimp with confidence.
Why Drip Acclimation Is Essential for Shrimp
Shrimp regulate their internal osmotic pressure based on the water around them. When they are suddenly placed into water with different TDS, GH, pH or temperature, their bodies attempt to adjust — but this adjustment takes time. A sudden shift overwhelms their regulatory mechanisms, causing:
- Osmotic shock — water rushes in or out of cells depending on the TDS difference, damaging tissues.
- Forced moulting — a sudden parameter change can trigger an emergency moult. If the new shell is not ready, the shrimp dies from an incomplete moult.
- Organ stress — rapid pH changes affect gill function, blood chemistry and metabolic processes.
- Delayed death — some shrimp survive the initial shock but die 24–72 hours later from cumulative stress.
Drip acclimation works by gradually replacing the bag water with tank water over one to two hours. By the time the shrimp are transferred, the water they are sitting in is virtually identical to the tank water, making the transition seamless.
What You Need
The equipment for drip acclimation is simple and inexpensive:
- A clean container — a small plastic tub, bucket or large cup. It needs to be large enough to hold the bag water plus the dripped tank water (typically 1–2 litres total).
- Airline tubing — standard aquarium airline tubing, available from any Singapore aquarium shop for a few dollars. Cut a piece about 1.5 metres long.
- A control valve or knot — an airline control valve (gang valve) lets you precisely adjust the drip rate. Alternatively, tie a loose knot in the airline tubing and tighten it to restrict flow.
- A small net — for transferring shrimp from the acclimation container to the tank at the end.
Total cost of equipment: under S$5 if you do not already have airline tubing.
Step-by-Step Drip Acclimation
Step 1: Open the Bag and Pour
Open the bag your shrimp arrived in and gently pour the entire contents — shrimp and water — into your acclimation container. Do not try to separate the shrimp from the bag water at this stage.
If the bag water is very shallow (less than 3–4 cm deep in the container), you may want to use a smaller container so the shrimp are fully submerged and not exposed to air.
Step 2: Position the Container
Place the acclimation container below the tank. The tank water needs to flow downward through the airline tubing via gravity. A common setup in HDB flats is to place the tank on a desk or shelf and the acclimation container on the floor below.
Step 3: Start the Siphon
Submerge one end of the airline tubing in the tank water. Suck on the other end (or use a syringe to prime it) until water begins to flow, then quickly place the flowing end into the acclimation container.
Step 4: Adjust the Drip Rate
Tighten the control valve or knot until the flow slows to a steady drip. The target rate is:
- 2–3 drips per second for Neocaridina shrimp
- 1–2 drips per second for Caridina shrimp (slower is safer)
Count the drips for 10 seconds and divide by 10 to verify your rate. A faster drip introduces tank water more quickly, which is less gradual. For sensitive Caridina, err on the side of slower.
Step 5: Drip Until the Water Volume Doubles or Triples
Let the drip continue until the water volume in the acclimation container has at least doubled (for Neocaridina) or tripled (for Caridina). This typically takes:
- Neocaridina: 45–60 minutes
- Caridina: 90–120 minutes
If the container fills up before you have reached the target volume, discard half the water from the container (being careful not to pour out any shrimp) and continue dripping.
Step 6: Transfer the Shrimp
Using a small, fine-mesh net, gently scoop the shrimp out of the acclimation container and place them into the tank. Work carefully — shrimp are delicate and can be injured by rough handling.
Do not pour the acclimation container water into your tank. This water is a mixture of bag water (which may contain ammonia, medications or different parameters) and tank water — it serves no purpose in your tank and could introduce unwanted substances.
Timing: How Long to Drip
The minimum acclimation times we recommend are:
| Shrimp Type | Minimum Drip Time | Ideal Drip Time | Notes |
|---|---|---|---|
| Neocaridina (Cherry, etc.) | 45 minutes | 60–90 minutes | More forgiving; still needs proper acclimation |
| Caridina (CRS, CBS, Bee) | 90 minutes | 120 minutes | Sensitive; longer is always safer |
| Taiwan Bee / Shadow Bee | 120 minutes | 150–180 minutes | Premium species; maximum caution warranted |
| Sulawesi shrimp | 120 minutes | 180+ minutes | Extremely parameter-sensitive |
There is no upper limit on acclimation time. You cannot over-acclimate. If you get distracted and the drip runs for three hours instead of two, that is fine — just ensure the shrimp remain submerged and the water temperature does not drift too far from the tank temperature.
Temperature Matching
Temperature matching is the one area where the traditional “float the bag” technique has merit for shrimp — not to replace drip acclimation, but as a preliminary step.
Before Drip Acclimation
If the bag water temperature differs significantly from your tank temperature (more than 2–3 °C), float the sealed bag in the tank for 15–20 minutes to equalise temperatures before opening the bag and beginning the drip process. In Singapore, where ambient temperatures are typically 28–32 °C and most shrimp bags are transported in our tropical climate, the temperature difference is usually small — but it is worth checking.
During Drip Acclimation
As tank water drips into the acclimation container, it also gradually brings the container water to the tank temperature. Over a one-to-two-hour drip, the temperature will equilibrate naturally. In Singapore’s warm ambient conditions, heat loss from the acclimation container is minimal — unlike in temperate countries where the container can cool significantly during winter acclimation.
Neocaridina vs Caridina Acclimation
While the basic process is the same, the margin for error differs significantly between these two groups.
Neocaridina
Cherry Shrimp, Snowball, Blue Dream and other Neocaridina species are relatively hardy. They tolerate a broader range of TDS (150–300), GH (6–12 dGH) and pH (6.5–8.0). Drip acclimation for Neocaridina is more about reducing stress than preventing death — most will survive a somewhat hurried acclimation, but they will thrive and colour up better if introduced gently.
Caridina
Crystal Red, Crystal Black, Bee, Taiwan Bee and Shadow Bee shrimp are kept in soft, acidic water with low TDS (typically 100–150). The difference between the seller’s water parameters and your tank parameters can be significant, even if both are “Caridina setups”. Different brands of remineraliser, different RO membrane outputs and different aquasoil ages all create variations.
For Caridina, drip acclimation is not just recommended — it is the difference between a successful introduction and losing your entire purchase. Take the full two hours. The shrimp are worth the patience.
Never Dump Bag Water Into Your Tank
This point deserves its own section because it is so important. The water your shrimp arrive in should never be added to your tank. Here is why:
- Ammonia — shrimp produce waste during transit. Bag water, especially after long shipping times, contains ammonia. In sealed bags, the CO2 from respiration keeps pH low, which converts toxic ammonia to less-toxic ammonium. Once the bag is opened, pH rises and the ammonium converts back to toxic ammonia. Adding this water to your tank introduces an ammonia spike.
- Different parameters — the seller’s water may have different TDS, GH and pH from yours. Even after drip acclimation, the mixed water in the container is not matched to your tank.
- Potential pathogens — bag water may contain bacteria, parasites or other organisms from the seller’s system that you do not want in your tank.
Always net the shrimp out and discard the acclimation water. For more on safe introduction practices for new livestock, see our guide on how to acclimate new fish, which covers the principles applicable to all aquatic animals.
After Release: What to Expect
Even with perfect drip acclimation, newly introduced shrimp go through an adjustment period. Here is what is normal and what warrants concern.
Normal Behaviour (First 24–48 Hours)
- Hiding — shrimp will immediately seek cover. This is instinctive and normal. They will hide in plants, under hardscape and behind equipment. Do not worry if you cannot see them for a day or two.
- Reduced activity — newly introduced shrimp are often less active than established ones. They may sit still on a surface, barely moving, for hours. This is normal stress behaviour that resolves within a day or two.
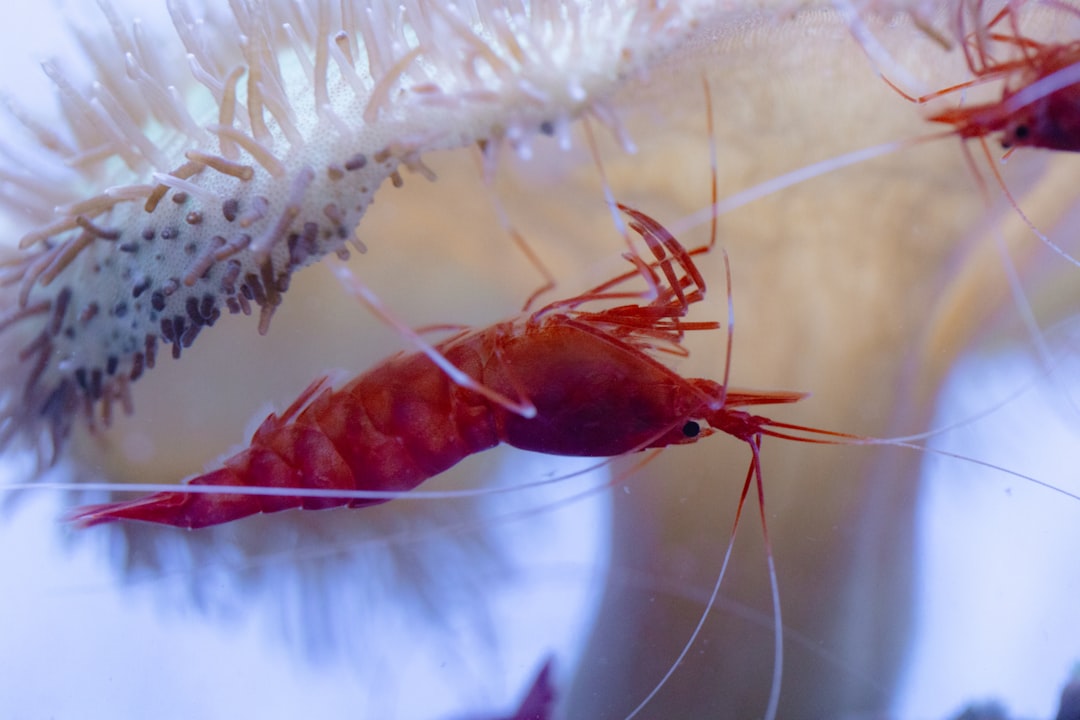
- Pale colouration — shrimp often lose colour intensity when stressed. Cherry Shrimp may appear nearly transparent. Colour returns within a few days as they settle in.
- Moulting — one moult within the first 24–48 hours is normal and can actually be a good sign, indicating the shrimp is adjusting to the new water. Multiple simultaneous moults in a group, however, suggest the acclimation was too rushed.
Warning Signs
- Lying on their side — shrimp lying motionless on their sides are in severe distress. There is little you can do at this point, but ensure water parameters are stable and well-oxygenated.
- Spinning or erratic swimming — frantic, uncontrolled swimming indicates acute stress, often from parameter shock.
- White ring of death — a white band between the head shield and body means a moult has failed. The shrimp may die within hours to days.
- No movement 24 hours after release — if shrimp are sitting completely motionless (not even antennae moving) after 24 hours, gently prod with a soft object. If they do not respond, they may have died.
First Week Tips
- Do not feed for the first 24 hours — shrimp will graze on biofilm and are not hungry during adjustment.
- Keep the lights dimmed or off for the first day to reduce stress.
- Do not perform a water change for at least 3–5 days after introducing new shrimp.
- Avoid any other changes to the tank (moving hardscape, adding plants, adjusting equipment) for the first week.
Frequently Asked Questions
Can I just float the bag and release the shrimp?
No. Float-and-release works for many fish species because fish are generally more tolerant of parameter differences. Shrimp are not. The bag water may differ significantly from your tank in TDS, GH and pH — all parameters that float-and-release does nothing to equilibrate. Drip acclimation is the only method that gradually adjusts the shrimp to your water chemistry.
What if my shrimp were in the bag for a long time (over 24 hours)?
Long transit times increase ammonia levels in the bag water. The acclimation process remains the same, but be extra careful not to add bag water to your tank. Some hobbyists recommend a slightly faster drip rate for long-transit shrimp to get them out of the ammonia-laden bag water sooner, while still allowing gradual parameter adjustment. If the transit was very long (over 36 hours), pour off most of the bag water immediately (keeping just enough for shrimp to be submerged) and begin dripping tank water in promptly.
Do I need to drip acclimate shrimp from a local Singapore shop?
Yes. Even if the shop is five minutes away, their water parameters likely differ from yours. The TDS, GH, pH and mineral composition of their tank water may be quite different from your setup. The transit time is not the issue — the parameter difference is. Always drip acclimate, regardless of how short the journey was.
My shrimp are not moving after release. Are they dead?
Not necessarily. Shrimp often remain motionless for hours after introduction as a stress response. Watch for antenna or leg movement — if the antennae are gently twitching, the shrimp is alive but stressed. Give it time. If after 24 hours the shrimp has not moved at all and does not respond to a gentle touch, it has likely died. In this case, remove it promptly to prevent water quality issues.
Buy Shrimp with Confidence
When you buy shrimp from Gensou at 5 Everton Park, Singapore, we brief every customer on the drip acclimation process and provide the guidance needed for a successful introduction. With over 20 years of shrimp keeping experience in Singapore’s unique conditions, we know what works. Get in touch to check availability or ask any questions about shrimp care.


